OpenSolaris 2009.06 has been recently released. Since ZFS offers a lot of flexibility and advantages as a storage platform, many would be interested in running the opensolaris stack. In this article I'll be installing OpenSolaris 2009.06 para-virtualized under a centos-5-x64 dom0. This setup has the advatange of running OpenSolaris on storage controllers that may not have native solaris driver support. Not that that would be recommended, however, it might be useful for testing. So, let's begin
- Install a minimal Centos-5-x64 installation. I installed the OS on a 20G partition, while the rest of the disk was formatted as LVM partition for creating logical volumes for xen guests to live on
- Install the latest Xen stack. I will be installing Xen-3.4. This is highly recommended since the bundled boot-loader pygrub has the ability to mount ZFS block devices.
[root@xen2 yum.repos.d]# cat > /etc/yum.repos.d/gitco.repo << EOF
> [gitco]
> name = Red Hat Enterprise $releasever - gitco
> baseurl = http://www.gitco.de/repo/xen3.4.0
> enabled = 1
> protect = 0
> gpgcheck = 0
> EOF
- Now let's install the required virtualization stack
[root@xen2 yum.repos.d]# yum install xen-libs.x86_64 bridge-utils.x86_64 qemu.x86_64 gtkglext-libs.x86_64 gtk-vnc.x86_64 gtk-vnc-python.x86_64 cyrus-sasl-md5.x86_64 libvirt.x86_64 libvirt-python.x86_64 python-virtinst virt-manager.x86_64 kernel-xen.x86_64 xen.x86_64 virt-viewer.x86_64 libvirt.x86_64 gnome-applet-vm.x86_64
Check that your menu.lst file has been updated to point to the newly installed Xen
[root@xen2 yum.repos.d]# cat /boot/grub/grub.conf
# grub.conf generated by anaconda
#
# Note that you do not have to rerun grub after making changes to this file
# NOTICE:  You do not have a /boot partition.  This means that
#          all kernel and initrd paths are relative to /, eg.
#          root (hd0,0)
#          kernel /boot/vmlinuz-version ro root=/dev/sda1
#          initrd /boot/initrd-version.img
#boot=/dev/sda
default=0
timeout=5
splashimage=(hd0,0)/boot/grub/splash.xpm.gz
hiddenmenu
title CentOS (2.6.18-128.1.10.el5xen)
        root (hd0,0)
        kernel /boot/xen.gz-3.4.0
        module /boot/vmlinuz-2.6.18-128.1.10.el5xen ro root=LABEL=/ rhgb quiet
        module /boot/initrd-2.6.18-128.1.10.el5xen.img
title CentOS (2.6.18-128.el5)
        root (hd0,0)
        kernel /boot/vmlinuz-2.6.18-128.el5 ro root=LABEL=/ rhgb quiet
        initrd /boot/initrd-2.6.18-128.el5.img
- Reboot into your new environment, and check you are booted on Xen-3.4
[root@xen2 ~]# xm dmesg | head
 __  __            _____ _  _    ___
 \ \/ /___ _ __   |___ /| || |  / _ \
  \  // _ \ '_ \    |_ \| || |_| | | |
  /  \  __/ | | |  ___) |__   _| |_| |
 /_/\_\___|_| |_| |____(_) |_|(_)___/

(XEN) Xen version 3.4.0 (root@gitco.tld) (gcc version 4.1.2 20080704 (Red Hat 4.1.2-44)) Fri May 29 21:39:26 CEST 2009
(XEN) Latest ChangeSet: unavailable
(XEN) Command line:
(XEN) Video information:
- Now we're ready to begin :) Make a folder and download the ISO in it
[root@xen2 ~]# mkdir -p /xen/osol/ && cd /xen/osol && wget http://genunix.org/distributions/indiana/osol-0906-x86.iso
- Let's loop mount the iso, extract the paravirt kernel and micro-root
[root@xen2 osol]# mkdir -p /mnt/loop
[root@xen2 osol]# mount -o ro,loop osol-0906-x86.iso /mnt/loop
[root@xen2 osol]# cp /mnt/loop/boot/amd64/x86.microroot /mnt/loop/platform/i86xpv/kernel/amd64/unix .
- Construct the Xen installation-time configuration file
[root@xen2 osol]# cat > osol0906install << EOF
> name = "osol0906install"
> memory = 1024
> vfb = [ 'type=vnc,vnclisten=127.0.0.1,vncdisplay=0' ]
> disk = ['file:/xen/osol/osol-0906-x86.iso,6:cdrom,r',
>  "phy:/dev/vgxen/osol,xvda,w" ]
> vif = [ "mac=00:16:36:10:f5:69,bridge=eth1" ]
> on_reboot = "destroy" # comment out this after installation
> kernel = "/xen/osol/unix"
> ramdisk = "/xen/osol/x86.microroot"
> extra = "/platform/i86xpv/kernel/amd64/unix - nowin -B install_media=cdrom"
> EOF
- Create the logical volume for the OpenSolaris installtion
[root@xen2 osol]# lvcreate -L 15G -n osol vgxen
  Logical volume "osol" created
[root@xen2 osol]# ls -l /dev/vgxen/osol
lrwxrwxrwx 1 root root 22 Jun  3 22:14 /dev/vgxen/osol -> /dev/mapper/vgxen-osol
- Start the Xen VM, and hit enter a few times for the defaults
[root@xen2 osol]# xm create ./osol0906install -c
Using config file "././osol0906install".
Started domain osol0906install (id=1)
v3.4.0 chgset 'unavailable'
SunOS Release 5.11 Version snv_111b 64-bit
Copyright 1983-2009 Sun Microsystems, Inc. All rights reserved.
Use is subject to license terms.
Hostname: opensolaris
Remounting root read/write
Probing for device nodes ...
NOTICE: xdf@6: failed to read feature-barrier
NOTICE: xdf@51712: failed to read feature-barrier
Preparing live image for use
Done mounting Live image
USB keyboard
1. Albanian 23. Lithuanian
2. Belarusian 24. Latvian
3. Belgian 25. Macedonian
4. Brazilian 26. Malta_UK
5. Bulgarian 27. Malta_US
6. Canadian-Bilingual 28. Norwegian
7. Croatian 29. Polish
8. Czech 30. Portuguese
9. Danish 31. Russian
10. Dutch 32. Serbia-And-Montenegro
11. Finnish 33. Slovenian
12. French 34. Slovakian
13. French-Canadian 35. Spanish
14. Hungarian 36. Swedish
15. German 37. Swiss-French
16. Greek 38. Swiss-German
17. Icelandic 39. Traditional-Chinese
18. Italian 40. TurkishQ
19. Japanese-type6 41. TurkishF
20. Japanese 42. UK-English
21. Korean 43. US-English
22. Latin-American
To select the keyboard layout, enter a number [default 43]:
1. Arabic
2. Chinese - Simplified
3. Chinese - Traditional
4. Czech
5. Dutch
6. English
7. French
8. German
9. Greek
10. Hebrew
11. Hungarian
12. Indonesian
13. Italian
14. Japanese
15. Korean
16. Polish
17. Portuguese - Brazil
18. Russian
19. Slovak
20. Spanish
21. Swedish
To select desktop language, enter a number [default is 6]:
User selected: English
Configuring devices.
Mounting cdroms
Reading ZFS config: done.
opensolaris console login: jack
Password:
Sun Microsystems Inc. SunOS 5.11 snv_111b November 2008
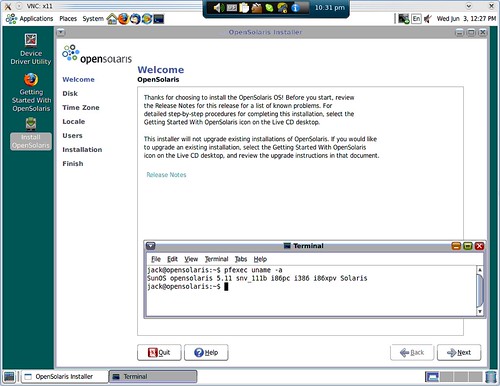
jack@opensolaris:~$ pfexec uname -a
SunOS opensolaris 5.11 snv_111b i86pc i386 i86xpv Solaris
jack@opensolaris:~$
jack@opensolaris:~$ ifconfig -a
lo0: flags=2001000849 mtu 8232 index 1
inet 127.0.0.1 netmask ff000000
xnf0: flags=1004843 mtu 1500 index 2
inet 192.168.96.121 netmask fffffc00 broadcast 192.168.99.255
lo0: flags=2002000849 mtu 8252 index 1
inet6 ::1/128
xnf0: flags=2004841 mtu 1500 index 2
inet6 fe80::216:36ff:fe10:f569/10
- Note that once the installation system boots up, we login with username/password = jack/jack. We use "ifconfig -a" to check the system's IP address (was configured by DHCP, VM NIC is bridged to physical host's eth1). The IP in this case is 192.168.96.121
- Now here comes a bit of a tricky part, the Xen console is text only, the OpenSolaris installtion is GUI only (yuck?) In order to get GUI access we will use a built in VNC service in the OpenSolaris Live CD. To get the password for the default vnc session, perform the following command on the Centos Host machine
[root@xen2 osol]# xenstore-ls | grep pass
     passwd = "guzc/VCg"
- Connect to the live CD and launch the installer
vncviewer 192.168.96.121:0
Continue with the installer GUI
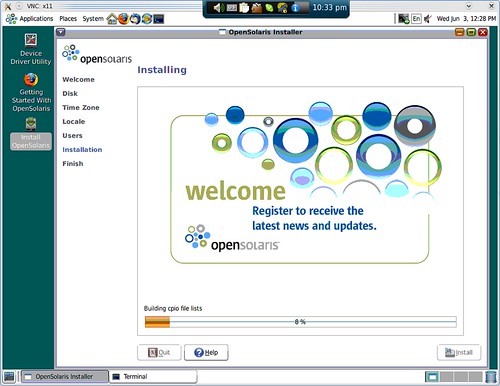
- Once done, click Reboot on the installer. The VM actually powers off, which is what we've configured and what we need.
- Create the run-time Xen config file
[root@xen2 osol]# cat > osol0906pv << EOF
> name = "osol0906pv"
> memory = 2048
> vfb = [ 'type=vnc,vnclisten=127.0.0.1,vncdisplay=0' ]
> disk = [ "phy:/dev/vgxen/osol,xvda,w" ]
> vif = [ "mac=00:16:36:10:f5:69,bridge=eth1" ]
> bootloader = '/usr/bin/pygrub'
> EOF
- Start the VM and enjoy :)
[root@xen2 osol]# xm create -c ./osol0906pv
Using config file "././osol0906pv".
Started domain osol0906pv (id=2)
                                v3.4.0 chgset 'unavailable'
SunOS Release 5.11 Version snv_111b 64-bit
Copyright 1983-2009 Sun Microsystems, Inc.  All rights reserved.
Use is subject to license terms.
NOTICE: xdf@51712: failed to read feature-barrier
Hostname: osol0906pv
Configuring devices.
Loading smf(5) service descriptions: 150/150
svccfg import warnings. See /var/svc/log/system-manifest-import:default.log .
Reading ZFS config: done.
Mounting ZFS filesystems: (6/6)
Creating new rsa public/private host key pair
Creating new dsa public/private host key pair

osol0906pv console login: dev
Password:
Sun Microsystems Inc.   SunOS 5.11      snv_111b        November 2008
dev@osol0906pv:~$ pfexec uname -a
SunOS osol0906pv 5.11 snv_111b i86pc i386 i86xpv Solaris
dev@osol0906pv:~$
Hope that's useful to someone out there


